Django Middleware Explained: The Complete Guide with Real-World Examples
Learn how Django processes every request and response, and why middleware is one of the most powerful features in Django.
Introduction
When I first started learning Django, I focused mainly on models, views, URLs, and templates. Everything worked well until I wondered:
- How does Django know whether a user is logged in?
- How are security headers automatically added to every response?
- Where does Django validate CSRF tokens?
- How can every request be logged without writing code in every view?
The answer to all of these questions is Middleware.
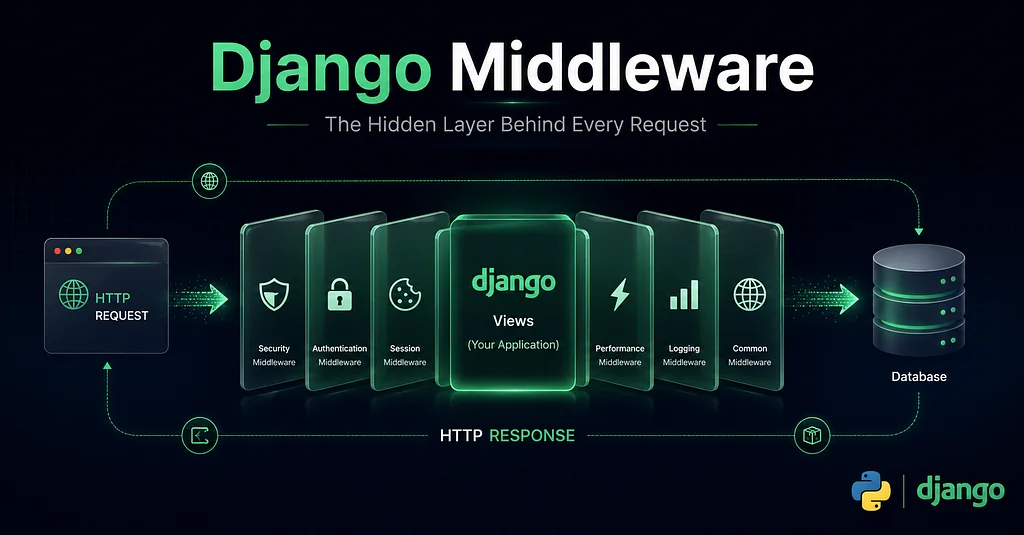
Middleware is one of Django’s most powerful features, yet many developers overlook it because it works silently in the background. Every request that enters your Django application and every response that leaves it passes through middleware.
Think of middleware as a security checkpoint at an airport.
Before passengers reach their boarding gate, they pass through several security checks. Each checkpoint has a specific responsibility:
- Verify identity
- Scan baggage
- Check boarding passes
- Ensure safety rules are followed
Similarly, every HTTP request in Django passes through a series of middleware components before reaching your view. After the view generates a response, that response travels back through the same middleware layers before being sent to the user’s browser.
This design allows Django to keep your application clean, secure, and maintainable without repeating the same logic in every view.
What You’ll Learn
By the end of this guide, you’ll understand:
- What Django Middleware is
- Why middleware is important
- How Django processes requests and responses
- How middleware execution works
- How to build custom middleware
- Real-world middleware examples
- Best practices for production applications
- Common mistakes to avoid
Whether you’re just starting with Django or preparing for backend interviews, understanding middleware will help you write cleaner and more scalable applications.
Why Should You Learn Middleware?
Most web applications need to perform common tasks on every request, such as:
- Authenticating users
- Managing sessions
- Protecting against CSRF attacks
- Logging requests
- Measuring response times
- Adding security headers
- Restricting access based on IP addresses
Without middleware, you would need to duplicate this logic in every view, making your code difficult to maintain.
Middleware solves this problem by providing a centralized place to handle request and response processing.
A Quick Preview
In the next section, we’ll explore exactly how an HTTP request travels through Django, from the browser to your view and back to the browser, using clear diagrams and real-world examples.
Understanding the Django Request Lifecycle
Every HTTP request follows a predictable journey inside Django. Understanding this journey makes middleware much easier to understand.
The Journey of Every HTTP Request
Whenever a user visits your Django application, a complete request-response cycle begins.
For example, imagine a user opens the following URL in their browser:
https://example.com/products/
When they press Enter, the browser sends an HTTP Request to your Django server.
But before that request reaches your view, it passes through several Django components.
The same happens when Django sends the response back.
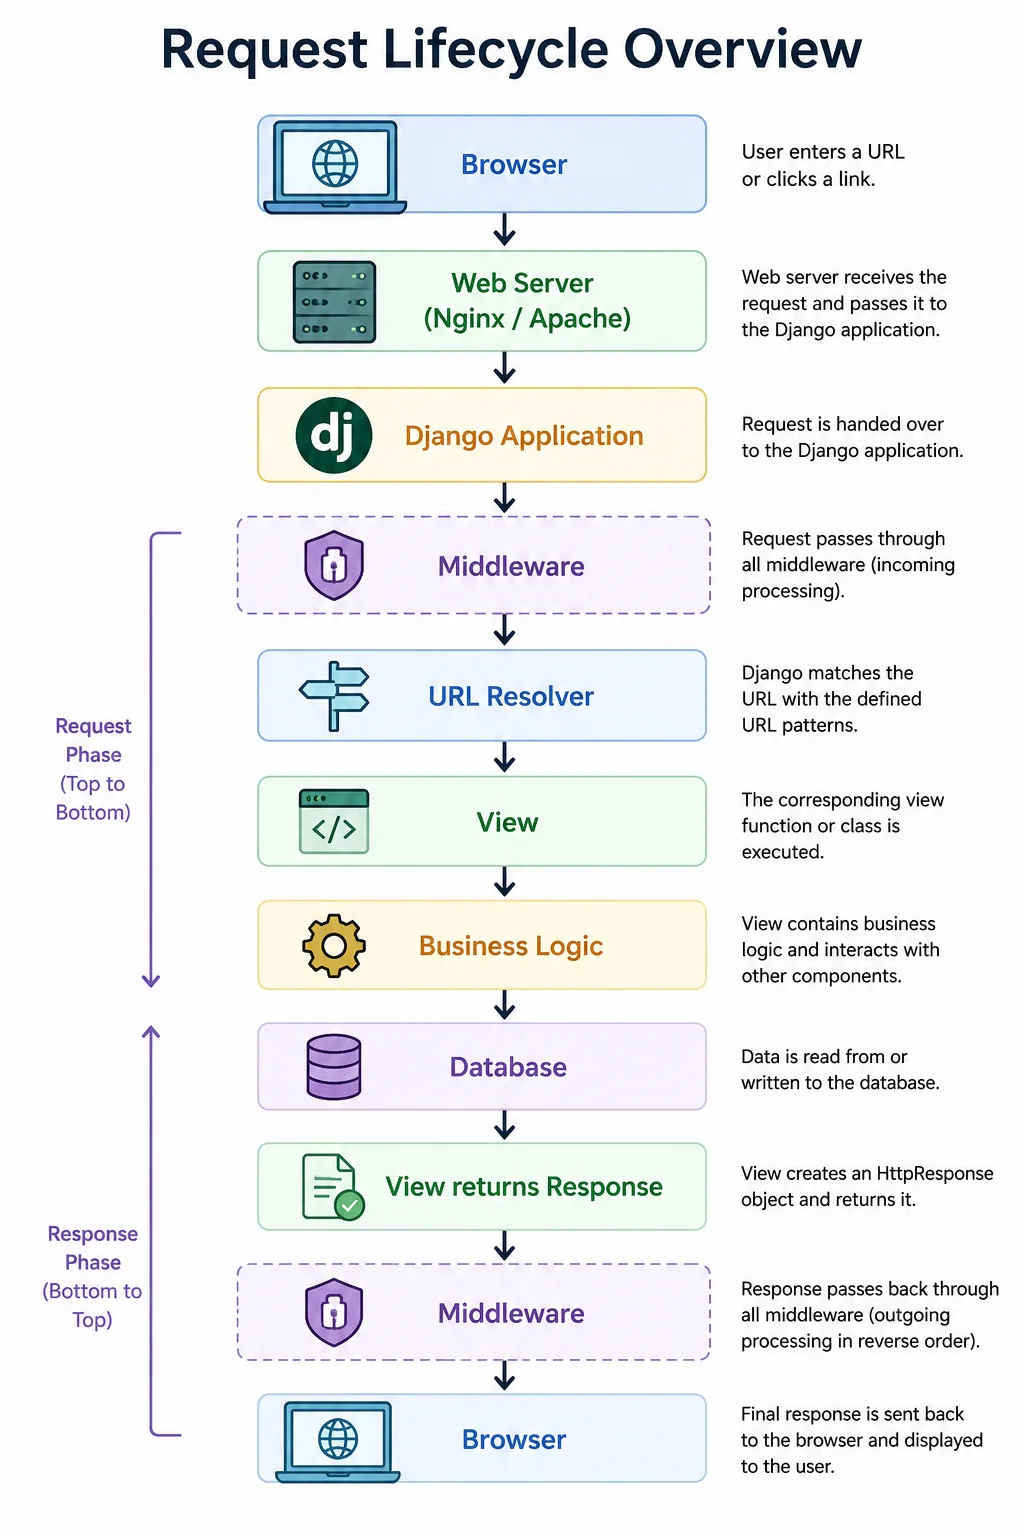
Notice that Middleware appears twice:
- Before the request reaches the view
- Before the response reaches the browser
This is why middleware is often described as a bridge between the client and your application.
Step 1: Browser Sends a Request
Everything begins with the user’s browser.
For example:
GET /products/
The request contains information such as:
- URL
- HTTP method (GET, POST, PUT, DELETE)
- Headers
- Cookies
- Authentication tokens
- User IP address
The browser sends this information to your Django application.
Step 2: Middleware Receives the Request
This is where middleware starts working.
Each middleware component gets an opportunity to inspect or modify the request.
For example, middleware can:
- Authenticate users
- Check CSRF tokens
- Load session data
- Add request IDs
- Log request details
- Reject malicious traffic
A middleware can even stop the request before it reaches the view.
Example:
Browser
     │
     ▼
Authentication Middleware

User Logged In?

YES → Continue

NO → Return 401 Unauthorized
The view is never executed if middleware decides to return a response early.
Step 3: URL Resolver
If the request passes all middleware checks, Django looks for the correct URL.
Example:
urlpatterns = [
    path("products/", views.products),
]
Django compares the requested URL with every URL pattern until it finds a match.
GET /products/
↓
products()
Step 4: Django View Executes
The view contains your application’s business logic.
Example:
def products(request):
    products = Product.objects.all()

    return render(
        request,
        "products.html",
        {"products": products}
    )
The view may:
- Read data
- Validate input
- Call external APIs
- Save records
- Query the database
- Generate HTML or JSON
Step 5: Database Interaction
Many views communicate with the database.
Example:
SELECT * FROM products;Django converts ORM queries into SQL behind the scenes.
The retrieved data is then returned to the view.
Step 6: Response is Created
The view returns an HTTP response.
Example:
return JsonResponse({
    "status": "success"
})
At this point, the response is not sent to the browser immediately.
Instead, it travels back through the middleware chain.
Step 7: Middleware Processes the Response
Now each middleware component can modify the outgoing response.
Examples include:
- Adding security headers
- Compressing content
- Logging response times
- Setting cookies
- Adding cache headers
- Modifying response headers
This makes middleware useful for both incoming requests and outgoing responses.
Real-World Example
Imagine a user logs into an e-commerce website.
The request flows like this:
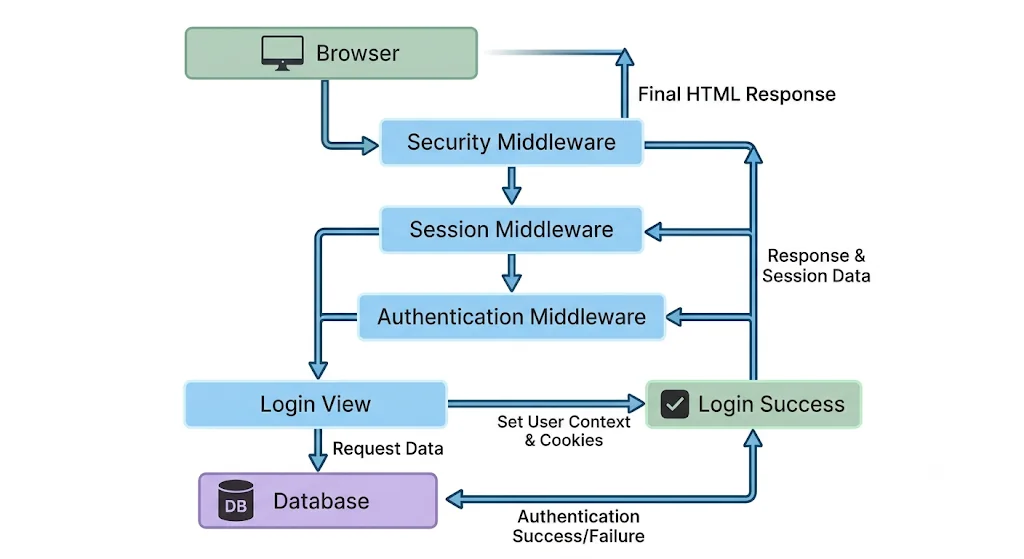
Each middleware performs one specific responsibility, making the application easier to maintain and extend.
Built-in Django Middleware Explained
Django comes with several built-in middleware components that solve common problems like security, authentication, session management, and protection against web attacks.
Why Does Django Include Built-in Middleware?
Imagine building every feature yourself:
- User authentication
- Session handling
- CSRF protection
- Security headers
- Clickjacking protection
- URL normalization
It would take a lot of time and increase the chance of bugs.
Instead, Django provides these features out of the box through middleware.
Simply enabling them in settings.py gives your application production-ready capabilities.
Where Are They Configured?
Open your settings.py file.
You’ll find a list like this:
MIDDLEWARE = [
    "django.middleware.security.SecurityMiddleware",
    "django.contrib.sessions.middleware.SessionMiddleware",
    "django.middleware.common.CommonMiddleware",
    "django.middleware.csrf.CsrfViewMiddleware",
    "django.contrib.auth.middleware.AuthenticationMiddleware",
    "django.contrib.messages.middleware.MessageMiddleware",
    "django.middleware.clickjacking.XFrameOptionsMiddleware",
]
Each middleware has a specific responsibility.
Django executes them from top to bottom during the request phase and from bottom to top during the response phase.
1. SecurityMiddleware
This middleware helps protect your application against common security threats.
What it does
- Redirects HTTP → HTTPS
- Adds Strict Transport Security (HSTS)
- Prevents insecure requests
- Improves browser security
Example
Without SecurityMiddleware:
http://example.com
With SecurityMiddleware enabled:
https://example.com
Your users are automatically redirected to the secure version of your website.
Real-world use case
Suppose your application processes online payments.
Using HTTPS ensures that:
- Passwords remain encrypted
- Payment information is protected
- Sensitive data isn’t exposed
2. SessionMiddleware
HTTP is stateless, meaning every request is treated as new.
SessionMiddleware allows Django to remember information across multiple requests.
Examples
- Logged-in user
- Shopping cart
- User preferences
- Language selection
Without sessions:
Request 1 → User logs in

Request 2 → Django forgets the user
With sessions:
Request 1 → Login
↓
Session Created
↓
Future Requests
↓
User remains logged in
3. CommonMiddleware
This middleware performs several useful tasks automatically.
Features
- Appends missing trailing slashes
- Blocks disallowed user agents
- Normalizes URLs
- Handles common HTTP improvements
Example: a user visits
/products
which automatically becomes:
/products/
This improves consistency across your application.
4. CsrfViewMiddleware
One of Django’s most important security features.
CSRF stands for Cross-Site Request Forgery.
It prevents attackers from submitting malicious forms on behalf of your users.
Without CSRF protection:
Attacker Website
↓
Hidden Form
↓
Bank Website
↓
Money Transfer
With CSRF protection:
Missing CSRF Token
↓
Request Rejected (403 Forbidden)
For HTML forms, Django automatically generates a CSRF token:
<form method="post">
    {% csrf_token %}
</form>
This simple tag provides a strong layer of protection.
5. AuthenticationMiddleware
This middleware identifies the currently logged-in user.
Once enabled, every request has access to:
request.userExample:
def dashboard(request):
    if request.user.is_authenticated:
        return render(request, "dashboard.html")
Without this middleware, Django wouldn’t know who is making the request.
6. MessageMiddleware
MessageMiddleware lets you display temporary notifications to users.
Example:
from django.contrib import messages

messages.success(
    request,
    "Profile updated successfully."
)
The message is displayed once and then automatically removed.
Common examples:
- Login successful
- Password changed
- Item added to cart
- Profile updated
7. XFrameOptionsMiddleware
This middleware protects your application against Clickjacking attacks.
A clickjacking attack tricks users into clicking invisible buttons embedded in another website.
With XFrameOptionsMiddleware enabled, Django sends security headers like:
X-Frame-Options: DENY
This prevents your pages from being embedded inside malicious iframes.
Built-in Middleware Summary
| Middleware | Purpose |
|---|---|
SecurityMiddleware | Adds security headers and HTTPS support |
SessionMiddleware | Maintains user sessions |
CommonMiddleware | Handles common HTTP improvements |
CsrfViewMiddleware | Protects against CSRF attacks |
AuthenticationMiddleware | Identifies logged-in users |
MessageMiddleware | Displays temporary messages |
XFrameOptionsMiddleware | Prevents clickjacking |
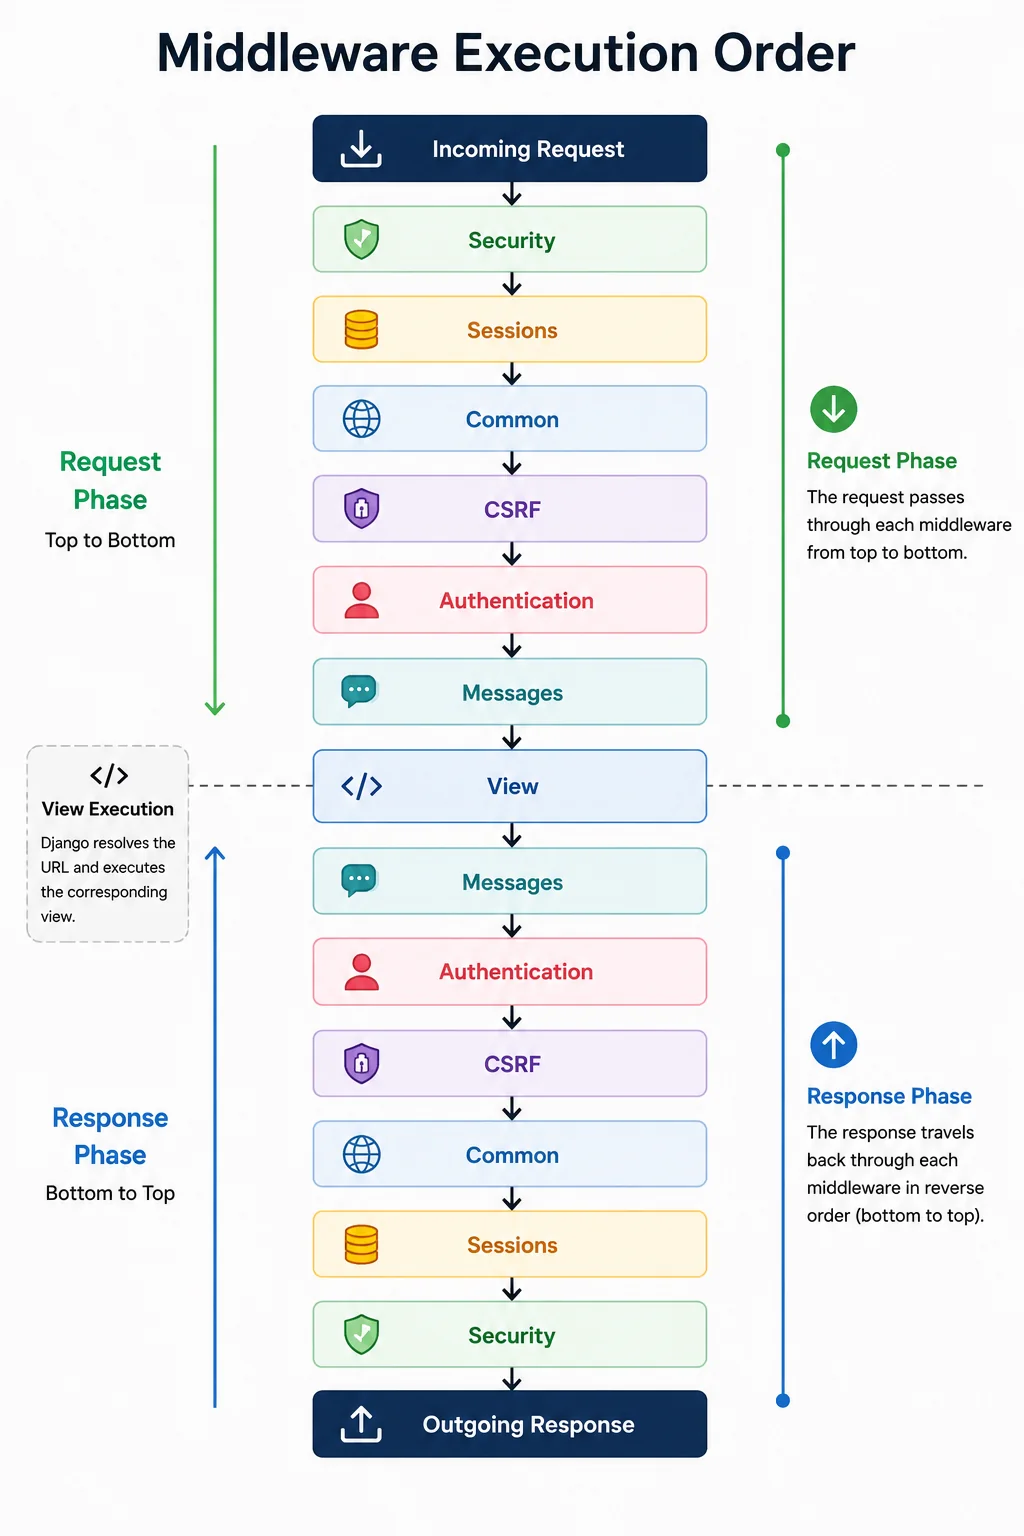
The order matters because each middleware depends on the previous one.
Building Your First Custom Middleware
Built-in middleware is powerful, but there are times when your application needs custom behavior. That’s where custom middleware comes in.
Why Create Custom Middleware?
Every application has unique requirements.
For example, you might want to:
- Log every incoming request
- Measure API response time
- Restrict access based on IP address
- Put the application into maintenance mode
- Add a unique Request ID
- Track API usage
- Validate custom headers
Instead of writing this logic in every view, you can write it once as middleware.
This keeps your code clean, reusable, and easy to maintain.
How Custom Middleware Works
Every middleware sits between the client and your Django views.
Browser
    │
    ▼
Custom Middleware
    │
    ▼
URL Resolver
    │
    ▼
View
    │
    ▼
Response
    │
    ▼
Custom Middleware
    │
    ▼
Browser
Notice that your middleware is executed twice:
- Before the request reaches the view
- After the view returns a response
Project Structure
Create a file named middleware.py inside your application.
Example project structure:
myproject/
│
├── manage.py
├── myproject/
│   ├── settings.py
│   ├── urls.py
│   └── wsgi.py
│
└── blog/
    ├── models.py
    ├── views.py
    ├── urls.py
    ├── middleware.py   ← Create here
    └── apps.py
You can organize multiple middleware classes inside the same file or split them into separate modules for larger projects.
Creating Your First Middleware
Let’s build a simple middleware that logs every requested URL.
class RequestLoggerMiddleware:

    def __init__(self, get_response):
        self.get_response = get_response

    def __call__(self, request):
        print(f"Request: {request.method} {request.path}")
        response = self.get_response(request)
        return response
Although this class is small, it demonstrates the basic structure of every Django middleware.
Understanding the Code
1. __init__()
def __init__(self, get_response):
    self.get_response = get_response
This method runs only once when Django starts.
It stores the next callable in the middleware chain.
2. __call__()
def __call__(self, request):This method runs for every incoming request.
Here you can:
- Inspect the request
- Modify the request
- Block the request
- Add custom attributes
3. Continue the request
response = self.get_response(request)This line passes the request to the next middleware or the Django view.
If you don’t call get_response(), the request stops here and never reaches your view.
4. Return the response
return responseAfter the view finishes processing, the response returns through your middleware.
Before returning it, you can:
- Add headers
- Modify cookies
- Log execution time
- Compress the response
Registering Middleware
Creating the middleware isn’t enough; you also need to register it.
Open settings.py:
MIDDLEWARE = [
    "django.middleware.security.SecurityMiddleware",
    "blog.middleware.RequestLoggerMiddleware",
    "django.contrib.sessions.middleware.SessionMiddleware",
    ...
]
Once added to the MIDDLEWARE list, Django automatically executes it for every request.
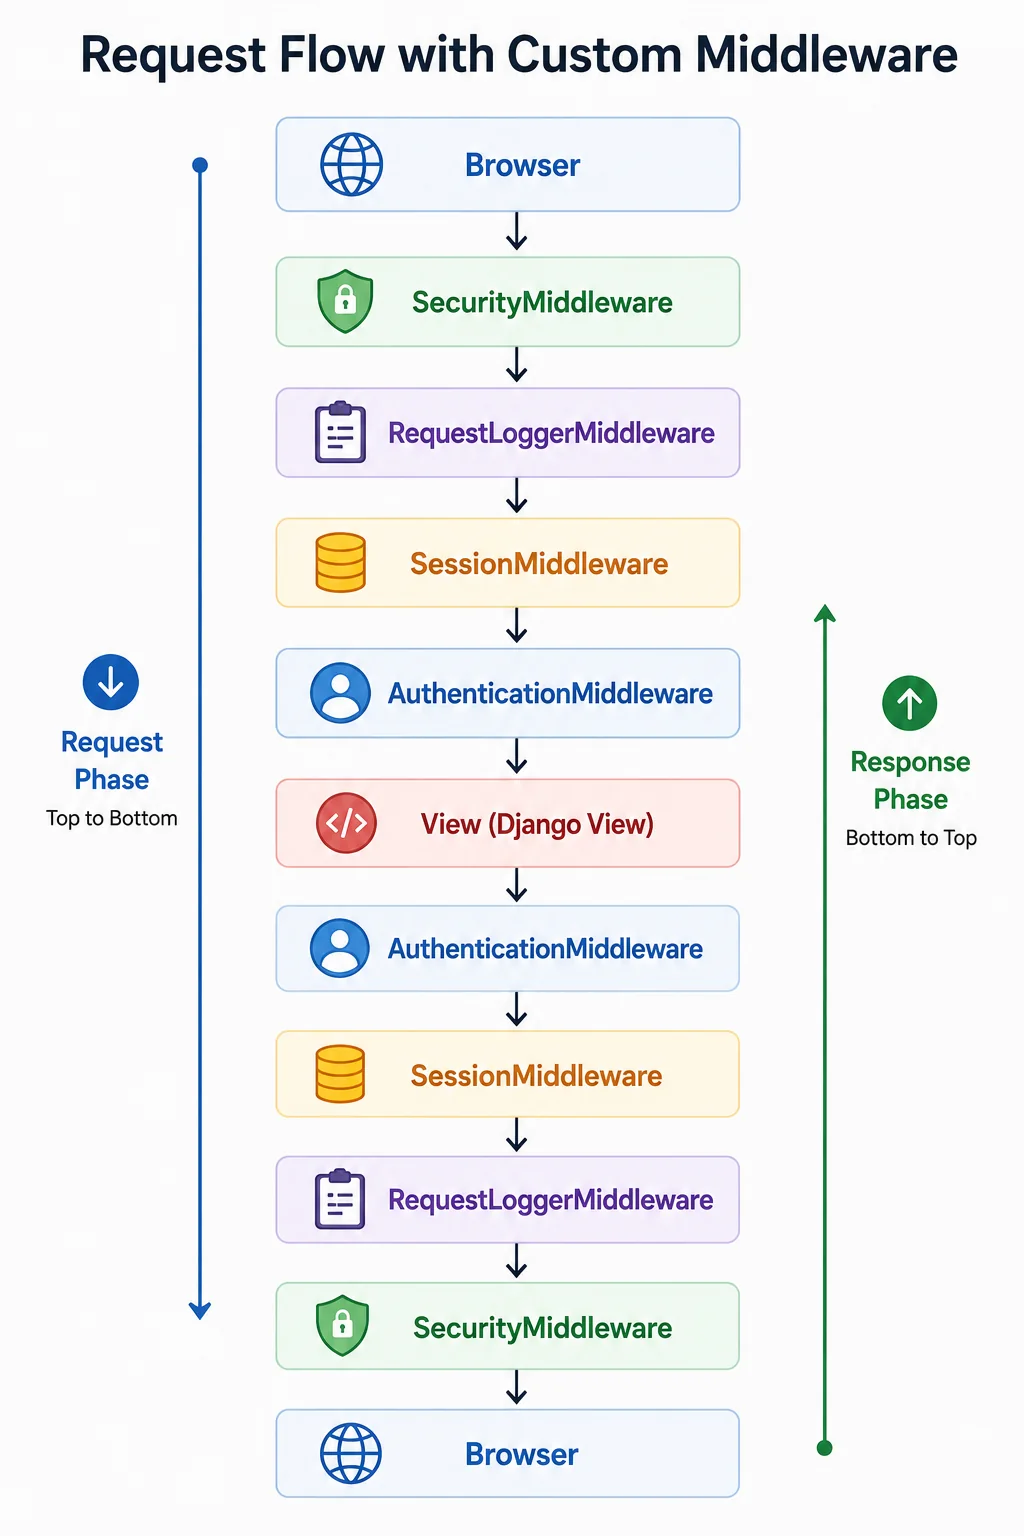
Middleware execution follows the same top-to-bottom (request) and bottom-to-top (response) pattern.
Real-World Example
Suppose a user visits:
https://example.com/products/
Your middleware logs:
Request: GET /products/
Then Django processes the request and returns the page.
You didn’t modify a single view, yet every request is now logged automatically.
Best Practices
- Keep middleware focused on one responsibility.
- Keep it lightweight and fast.
- Avoid heavy database queries.
- Don’t put business logic inside middleware.
- Reuse middleware across projects whenever possible.
- Place middleware in the correct order.
Common Beginner Mistakes
- Forgetting to register middleware in
settings.py - Not calling
get_response(request) - Performing slow database operations on every request
- Mixing business logic with middleware
- Using middleware when a view decorator would be more appropriate
Real-World Middleware Examples
Middleware becomes truly valuable when it solves real problems that every request passes through. Let’s look at some practical examples used in production Django applications.
Why Use Middleware in Real Projects?
Instead of writing the same code in every view, middleware allows you to implement it once and automatically apply it to every request.
Some common use cases include:
- Logging incoming requests
- Measuring response time
- Restricting access
- Adding request IDs
- Enabling maintenance mode
- Monitoring API usage
Let’s explore each one.
1. Request Logger Middleware
Every production application should keep a log of incoming requests.
This helps you:
- Debug issues
- Monitor traffic
- Audit user activity
import logging

logger = logging.getLogger(__name__)

class RequestLoggerMiddleware:

    def __init__(self, get_response):
        self.get_response = get_response

    def __call__(self, request):
        logger.info(
            "%s %s",
            request.method,
            request.path
        )

        return self.get_response(request)
Sample output
GET /products/
POST /login/
GET /dashboard/
2. Response Time Middleware
Slow applications create a poor user experience.
This middleware measures how long each request takes.
import time

class ResponseTimeMiddleware:

    def __init__(self, get_response):
        self.get_response = get_response

    def __call__(self, request):
        start = time.perf_counter()
        response = self.get_response(request)
        duration = (
            time.perf_counter() - start
        )
        print(
            f"Response Time: {duration:.3f}s"
        )
        return response
Example output
Response Time: 0.042s
Response Time: 0.156s
This is especially useful for performance monitoring.
3. Request ID Middleware
In large applications, multiple requests are processed simultaneously.
Adding a unique Request ID makes it easier to trace logs.
import uuid

class RequestIDMiddleware:

    def __init__(self, get_response):
        self.get_response = get_response

    def __call__(self, request):
        request.request_id = str(uuid.uuid4())

        return self.get_response(request)
Example
Request ID:
f8b12d19-2c8e-47ef
You can include this ID in logs for easier debugging.
4. Maintenance Mode Middleware
Sometimes your application needs temporary maintenance.
Instead of stopping the server, middleware can return a friendly message.
from django.http import HttpResponse

MAINTENANCE_MODE = True

class MaintenanceMiddleware:

    def __init__(self, get_response):
        self.get_response = get_response

    def __call__(self, request):
        if MAINTENANCE_MODE:
            return HttpResponse(
                "We'll be back soon!",
                status=503
            )

        return self.get_response(request)
Result
503 Service Unavailable
We'll be back soon!
This approach provides a better experience than showing server errors.
5. IP Address Logger
Knowing where requests come from is useful for analytics and security.
class IPLoggerMiddleware:

    def __init__(self, get_response):
        self.get_response = get_response

    def __call__(self, request):
        ip = request.META.get(
            "REMOTE_ADDR"
        )
        print(ip)
        return self.get_response(request)
Example output
192.168.1.25
You can also store IP addresses in a database or send them to a monitoring system.
6. Simple Rate Limiter
Protect your application from excessive requests.
This example limits repeated requests from the same IP.
from django.core.cache import cache
from django.http import HttpResponse

class RateLimitMiddleware:
    LIMIT = 100

    def __init__(self, get_response):
        self.get_response = get_response

    def __call__(self, request):
        ip = request.META.get("REMOTE_ADDR")
        key = f"rate:{ip}"
        count = cache.get(key, 0)

        if count >= self.LIMIT:
            return HttpResponse(
                "Too Many Requests",
                status=429
            )
        cache.set(key, count + 1, timeout=60)

        return self.get_response(request)
This middleware allows up to 100 requests per minute from a single IP address.
Which Middleware Should You Build?
| Middleware | Common use case |
|---|---|
| Request Logger | Debugging & monitoring |
| Response Timer | Performance optimization |
| Request ID | Log tracing |
| Maintenance Mode | Scheduled updates |
| IP Logger | Security & analytics |
| Rate Limiter | Prevent abuse & API protection |
Production Tips
When building middleware for production:
- Keep it fast.
- Avoid unnecessary database queries.
- Use caching where possible.
- Handle exceptions gracefully.
- Write clear logs.
- Test middleware independently.
Middleware Execution Order & Best Practices
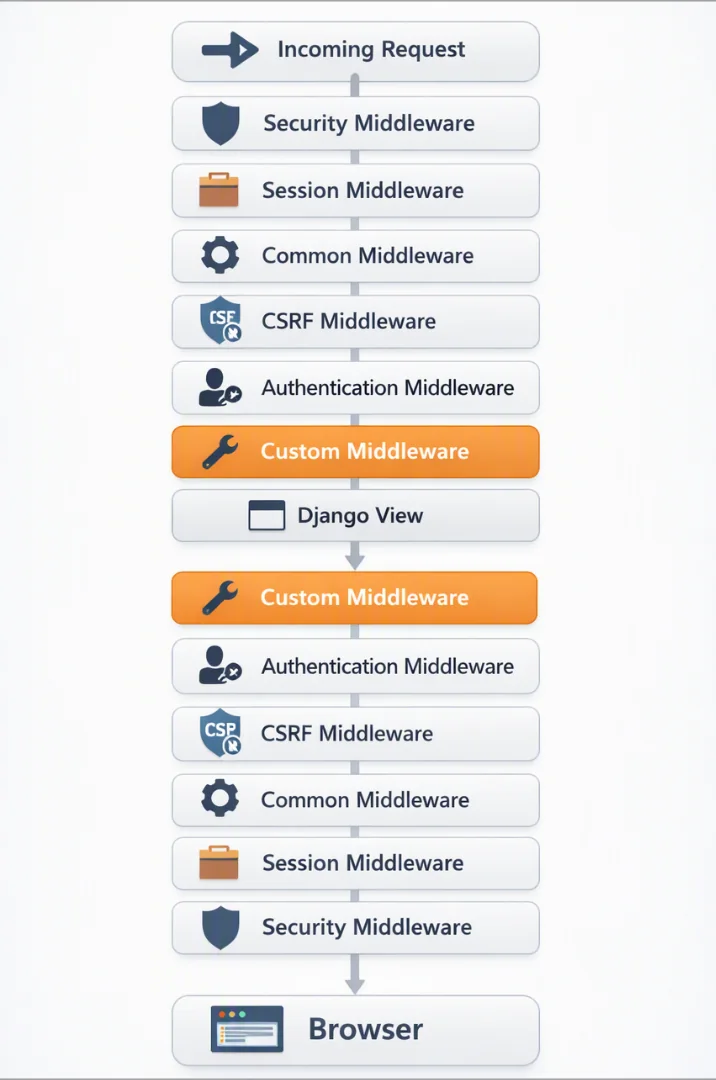
Middleware order isn’t random. The position of each middleware determines how requests and responses are processed.
Why Middleware Order Matters
When Django receives a request, it doesn’t execute middleware randomly.
It follows the exact order defined in your settings.py file.
Likewise, when returning a response, Django executes the middleware in the reverse order.
Understanding this flow is essential because some middleware depends on others.
For example:
- AuthenticationMiddleware requires SessionMiddleware to run first.
- CsrfViewMiddleware should execute before the view processes POST requests.
- SecurityMiddleware should be one of the first middleware to protect every request.
Middleware Execution Flow
Example Execution
Suppose your project has the following middleware configuration:
MIDDLEWARE = [
    "django.middleware.security.SecurityMiddleware",
    "django.contrib.sessions.middleware.SessionMiddleware",
    "blog.middleware.RequestLoggerMiddleware",
]
When a user opens:
https://example.com/products/
Django executes them in this order.
Request phase
SecurityMiddleware
↓
SessionMiddleware
↓
RequestLoggerMiddleware
↓
View
Response phase
View
↓
RequestLoggerMiddleware
↓
SessionMiddleware
↓
SecurityMiddleware
Notice how the response travels back through the middleware in reverse.
Why Is This Important?
Imagine your custom middleware needs the logged-in user.
If you place it before AuthenticationMiddleware, then request.user may not be available.
Instead, place your middleware after AuthenticationMiddleware if it depends on authenticated users.
Choosing the correct order prevents unexpected bugs.
Middleware Order Best Practices
1. Keep security first
Always place security-related middleware near the top, such as SecurityMiddleware.
This ensures every request is protected as early as possible.
2. Authentication depends on sessions
The authentication system needs session information.
Correct order
SessionMiddleware
↓
AuthenticationMiddleware
Incorrect order
AuthenticationMiddleware
↓
SessionMiddleware
The incorrect order can lead to authentication issues.
3. Keep middleware lightweight
Middleware runs on every request.
Avoid
- Heavy database queries
- Large file operations
- External API calls
Instead
- Read headers
- Add logging
- Validate requests
- Attach metadata
4. One responsibility per middleware
Good middleware:
Logging Middleware
↓
Authentication Middleware
↓
Rate Limiter
Avoid creating one middleware that performs multiple unrelated tasks.
Keeping each middleware focused makes it easier to test, maintain, and reuse.
5. Return responses early when needed
Middleware can stop a request before it reaches the view.
if not request.user.is_authenticated:
    return HttpResponse(
        "Unauthorized",
        status=401
    )
This improves performance because Django skips unnecessary processing.
Common Mistakes
Running database queries on every request
Product.objects.count()Doing this inside middleware means the query runs for every page, even when it isn’t needed.
Putting business logic in middleware
Middleware is not the place for order processing, payment calculations, or report generation.
Business logic belongs in:
- Views
- Services
- Models
Middleware should only handle request/response concerns.
Forgetting to call get_response()
response = self.get_response(request)Without this line, Django never reaches your view.
Ignoring performance
Even an extra 20 milliseconds per request becomes significant under heavy traffic.
For example:
20 ms × 10,000 requests
=
200 seconds of extra processing
Small inefficiencies can have a big impact at scale.
Production Tips
For production applications:
- Use structured logging.
- Keep middleware stateless whenever possible.
- Cache frequently used data.
- Handle exceptions gracefully.
- Write unit tests for custom middleware.
- Document the purpose of each middleware.
Quick Checklist
Before deploying custom middleware, ask yourself:
- Does it have one clear responsibility?
- Is it lightweight?
- Is it placed in the correct order?
- Does it call
get_response()? - Has it been tested?
- Does it avoid unnecessary database queries?
If the answer is yes, your middleware is ready for production.
Conclusion & Key Takeaways
Middleware is one of Django’s most powerful features. Mastering it will help you build cleaner, more secure, and more maintainable web applications.
What We’ve Learned
Throughout this guide, we’ve explored how Django Middleware works and why it’s an essential part of every Django application.
Here’s a quick recap:
Middleware processes every request
Before a request reaches your Django view, it passes through the middleware chain where it can be inspected, modified, or even blocked.
Middleware also processes every response
After the view generates a response, it travels back through the middleware before being sent to the user’s browser.
Django includes powerful built-in middleware
Out of the box, Django provides middleware for:
- Security
- Authentication
- Sessions
- CSRF Protection
- Messages
- Clickjacking Protection
These components help you build secure applications with minimal configuration.
Custom middleware makes applications cleaner
Instead of repeating the same code in multiple views, middleware allows you to centralize common functionality such as:
- Request logging
- Response timing
- Maintenance mode
- Request IDs
- IP filtering
- Rate limiting
Middleware in One Diagram
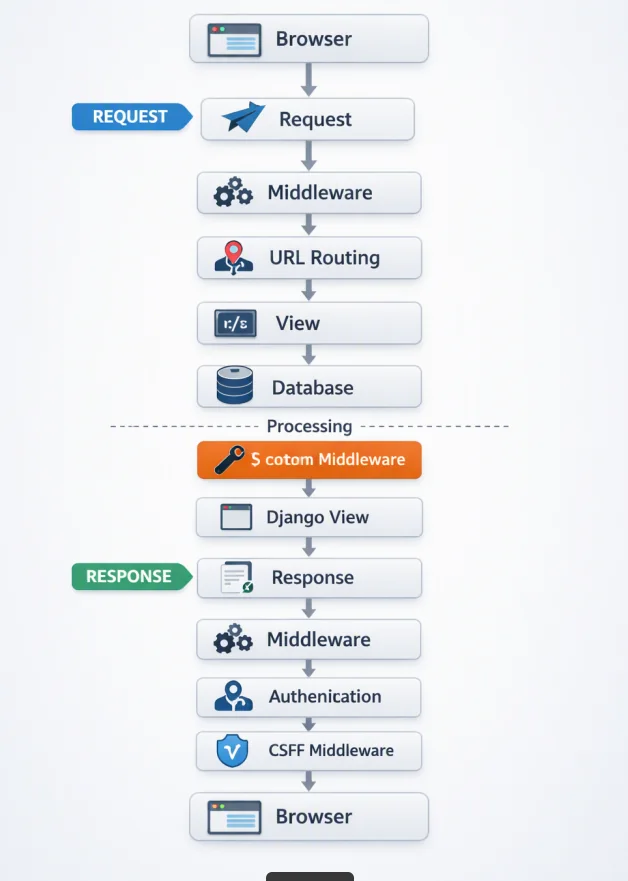
Remember: Middleware runs before the view on incoming requests and after the view on outgoing responses.
Best Practices Checklist
Before adding a middleware to your project, ask yourself:
- Does it solve a common problem across the application?
- Is it lightweight and efficient?
- Does it have a single responsibility?
- Is it registered in the correct order?
- Does it call
get_response(request)? - Has it been tested?
Following these practices will keep your application fast, maintainable, and scalable.
Final Thoughts
Django Middleware is more than just another framework feature. It’s the backbone of many core functionalities that make Django secure and developer-friendly.
As you build larger applications, you’ll find middleware invaluable for handling cross-cutting concerns without cluttering your views.
Whether you’re implementing authentication, logging, performance monitoring, or custom request processing, middleware provides a clean and reusable solution.
Start with Django’s built-in middleware, then gradually create your own as your application’s requirements grow.
What’s Next?
Now that you understand middleware, consider exploring these Django topics next:
These concepts build naturally on what you’ve learned about middleware.
Thank You
Thank you for reading!
I hope this guide helped you understand Django Middleware in a simple and practical way. If you found it useful, feel free to share it with other developers or leave your thoughts in the comments on Medium.
Happy coding!